
15分間でバックアップソリューションの導入から実行まで
異種OS混在ネットワークの環境を15分間でセキュアにバックアップ(オープンソースのソフトウェアのみを使用)
-
- 最新のコンフィギュレーションツールを使用する、コミュニティ最新版のAmanda 2.6.0p2
-
- 新たにVSSに対応できるようになった、Zmanda Windowクライアントのコミュニティ版
今日のビジネスにおいては、一種のOSのみ使用しての運営はまれです。Linuxのユーザや管理者は各自の好みに応じたLinuxディストリビューションを使用し、WebデザイナーはMacを使用し、旧来のソフトやハードにはUNIX系のOSを使用していることでしょう。現代ビジネスにおける複雑なコンピュータ環境では、信頼できるバックアップソリューションの選択が求められます。
ネットワークされたリソースに重要なファイルを格納している場合にでも、知的財産であるデータの真のセキュリティのためには、デスクトップパソコンやノートパソコンもバックアップしておくべきです。ハードディスクストレージの価格は下がり続けていて、テラバイトのストレージにも手が届くようになってきました。しかしデータ量が増えることによりデータ紛失の可能性もでてきます(基本的に、利用できる保管容量に合わせてデータが拡張するため)。現代のグローバルな電子商取引経済により、ビジネスは休むことなく、重要なビジネスデータは絶えず変化しています。
15分間の挑戦
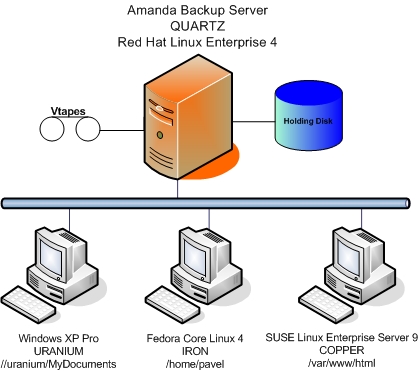
15分間を目標にして、自由に利用のできるオープンソースのソフトのみを使い、Windowsのシステムと、2種類の異なるLinuxディストリビューションのシステムをバックアップします。
以下の状況を想定します:
ユーザの「pavel」は重要な情報を扱っています。Ironと名前をつけたFedora Core Linuxのシステム上のホームディレクトリ/home/pavel を暗号化してバックアップする必要があります。Webサイト管理者はCopperと名前をつけたSUSE Enterprise Linux のシステム上のwebサーバのドキュメントホームである/var/www/html ディレクトリをバックアップする必要があります。マネージャーはUraniumと名前をつけたWindows XPのシステムのみを扱い、マイドキュメントフォルダにすべてを保存するので//Uranium/MyDocuments をバックアップする必要があります。
ソリューション: Amanda
Amandaは、柔軟で、セキュア、拡張性のあるオープンソース型のバックアップソフトです。大事な時にバックアップスクリプトが中断されることのある、ベンダ独自仕様の高価なバックアップソフトは必要ではありません。1991年以降、Amandaは、単体のスタンドアローン型マシンから何百ものクライアントの環境にまで使用され、成功を収めてきました。Amandaにはコミュニティのウィキからシステム運営の出版本にいたるまで徹底したドキュメントがそろいます。難しいと思われるかもしれませんが、Amandaを使用したバックアップはとても簡単にできます。
本文は15分間で実行できる処理の説明をするものです:
1. Amandaバックアップサーバのインストールと設定
2. バックアップ対象となる3台の異なるクライアント機を準備
3. バックアップのパラメータ設定
4. 設定の検証
5. バックアップの検証
Red Hat Enterprise Linux搭載のQuartzにAmandaバックアップサーバのソフトをインストール・設定します。CopperとIronにAmandaバックアップクライアントのソフトをインストール・設定します。Windows XP搭載のクライアント機であるUraniumのバックアップにはAmandaサーバのソフトと併せてバックアップサーバであるQuartz上のSamba を使います。
-
クライアント
ファイルシステム
OS
圧縮
暗号化
Copper
/var/www/html
SLES9
する
しない
Iron
/home/pavel
FC4
する
する
Uranium
//uranium/MyDocuments*
WINXP
する
しない
*Sambaを使用(Windowsのシステムにはソフトを何もインストールしなくてよい)
Amandaは、ディスクストレージをバックアップメディアとして使用することができます。バックアップの設定、開始、確認を15分間で完了することができます。
事前に必要とされる準備
Amandaの基本セットアップは、Amandaサーバ、Amandaクライアント(バックアップされます)、バックアップ記録メディア(磁気テープや HDD)で構成されます。中間でデータをキャッシュする保管場所は必ずしも必要ではありませんが、パフォーマンスを著しく向上させることから、基本セットアップの一部とします。
設定を開始する前に、Amandaの概要を再度見直しておいて下さい。次に以下にあげる準備を確認してください:
-
Quartz、 Iron、Copperにtar 1.15以降のバージョンとxinetdがインストールされている
-
Quartz からrootユーザに電子メールの送信が可能である
-
すべてのシステムが同一のネットワーク上にあり利用可能である
-
rootでのアクセス権限を持ち、SSH接続でのrootアクセスが有効である
-
バックアップされるディレクトリが存在する
-
Amanda 2.5.1p2 backup_server RPM が Quartz上で利用でき、 backup_client RPM がIron 上と Copper上で利用できる(Amanda のバイナリもしくはソースでのRPMパッケージと、ソースでのtarballはZmandaから入手可能)
-
バックアップサーバのQuartz上で、Samba クライアントソフトが動作している。Sambaも自由に利用のできるオープンソースソフトです。)
Iron上の/home/pavelを暗号化してバックアップするためには、Ironに以下のパッケージをインストールして利用のできる状態にする必要があります。
ここではAmandaを初めてインストールすることを想定しています。すでにインストールされているAmandaのアップグレードには他の手順が追加されます。(2.5.1p2 以降のバージョン)
コツ: 本文の例をすべてコピー&ペーストした後、各自の環境に合わせて修正します。
15分間の開始
ここからストップウォッチをセットして時間を計っていきます。
Amandaバックアップサーバのインストールと設定
1.Red Hat Enterprise Linux 4サーバのQuartz にrootでログインします
2.Amanda 2.5.1p2 amanda-backup_server RPMをインストールします。このパッケージのインストール中にdiskグループに属するamandabackupという名前のユーザを作成します。
[root@quartz server]# rpm -ivh amanda-backup_server-2.5.1p2-1.rhel4.i386.rpm
warning:
amanda-backup_server-2.5.1p2-1.rhel4.i386.rpm: V3 DSA signature: NOKEY,
key ID
3c5d1c92
Preparing... ########################################### [100%]
Jan 5 2007
12:12:55: Preparing to install: Amanda Community Edition - version
2.5.1p2
Jan 5 2007
12:12:55: Checking for 'amandabackup' user...
Jan 5 2007
12:12:55:
Jan 5 2007
12:12:55: The Amanda backup software is
configured to operate as the
Jan 5 2007
12:12:55: user 'amandabackup'. This user exists on your system and has not
Jan 5 2007
12:12:55: been modified. To ensure that Amanda functions properly,
Jan 5 2007
12:12:56: please see that the following
parameters are set for that
Jan 5 2007
12:12:56: user.:
Jan 5 2007
12:12:56:
Jan 5 2007
12:12:56: SHELL: /bin/sh
Jan 5 2007
12:12:56: HOME: /var/lib/amanda
Jan 5 2007
12:12:56: Default group: disk
Jan 5 2007
12:12:56:
Jan 5 2007
12:12:56: Checking ownership of
'/var/lib/amanda'... correct.
Jan 5 2007
12:12:57:
Jan 5 2007
12:12:57: === Amanda backup server installation started. ===
1:amanda-backup_server ########################################### [100%]
Jan 5 2007
12:13:05: Updating system library cache...done.
Jan 5 2007
12:13:21: Installing '/etc/amandates'.
Jan 5 2007
12:13:21: The file '/etc/amandates' has been created.
Jan 5 2007
12:13:21: Ensuring correct permissions for '/etc/amandates'.
Jan 5 2007
12:13:21: '/etc/amandates' Installation successful.
Jan 5 2007
12:13:22: Checking '/var/lib/amanda/.amandahosts' file.
Jan 5 2007
12:13:22: Checking for '/var/lib/amanda/.profile' and ensuring correct
environment.
Jan 5 2007
12:13:23: Setting ownership and permissions for
'/var/lib/amanda/.profile'
Jan 5 2007
12:13:23: === Amanda backup server installation complete. ===
Amanda installation log can be found in
'/var/log/amanda/install.log' and errors (if any) in
'/var/log/amanda/install.err'.
3.Amandaは、拡張されたインターネットサービスデーモンのxinetdにより起動されるので、Amandaサーバとクライアントすべてにxinetdをインストールする必要があります。どのテキストエディタを使用しても良いので、xinetdの起動ファイルである、以下の内容の/etc/xinetd.d/amandaserverを作成してください。
Quartzに/etc/xinetd.d/amandaserverファイルを作成する:
#
default: on
#
# description: Amanda services for Amanda server
and client.
#
service amanda
{
disable = no
socket_type = stream
protocol = tcp
wait = no
user = amandabackup
group =
disk
groups =
yes
server =
/usr/lib/amanda/amandad
server_args = -auth=bsdtcp amdump
amindexd amidxtaped
}
4.Quartz上のxinetdを再起動させる
[root@quartz xinetd.d]# service xinetd reload
Reloading configuration: [ OK ]
5.経過時間を確認します。ここまで5分でできているはずです。
3つの異なるAmandaクライアントのインストールと設定
Iron(FC4)へのAmandaクライアントRPMのインストール
1.Fedora Core 4クライアントのIronにrootでログイン
2.Amanda 2.5.1p2 backup_client RPMのインストール。パッケージのインストール中にdiskグループに属するamandabackupという名前のユーザを作成します。
[root@iron
client]# rpm -ivh
amanda-backup_client-2.5.1p2-1.fc4.i386.rpm
warning:
amanda-backup_client-2.5.1p2-1.fc4.i386.rpm: Header V3 DSA signature:
NOKEY,
key ID 3c5d1c92
Preparing... ########################################### [100%]
Jan 5 2007
10:17:16: Preparing to install: Amanda Community Edition - version
2.5.1p2
Jan 5 2007
10:17:16: Checking for 'amandabackup' user...
Jan 5 2007
10:17:16:
Jan 5 2007
10:17:16: The Amanda backup software is
configured to operate as the
Jan 5 2007
10:17:17: user 'amandabackup'. This user exists on your system and has not
Jan 5 2007
10:17:17: been modified. To ensure that Amanda functions properly,
Jan 5 2007
10:17:17: please see that the following
parameters are set for that
Jan 5 2007
10:17:17: user.:
Jan 5 2007
10:17:17:
Jan 5 2007
10:17:17: SHELL: /bin/sh
Jan 5 2007
10:17:17: HOME: /var/lib/amanda
Jan 5 2007
10:17:17: Default group: disk
Jan 5 2007
10:17:17:
Jan 5 2007
10:17:17: Checking ownership of
'/var/lib/amanda'... correct.
Jan 5 2007
10:17:17:
Jan 5 2007
10:17:17: === Amanda backup client installation started. ===
1:amanda-backup_client ###########################################
[100%]
Jan 5 2007
10:17:21: Updating system library cache...done.
Jan 5 2007
10:17:30: Checking '/var/lib/amanda/.amandahosts' file.
Jan 5 2007
10:17:31: Checking for '/var/lib/amanda/.profile' and ensuring correct
environment.
Jan 5 2007
10:17:31: Setting ownership and permissions for
'/var/lib/amanda/.profile'
Jan 5 2007
10:17:31: Checking for '/var/lib/amanda/.profile' and ensuring correct
environment.
Jan 5 2007
10:17:31: Setting ownership and permissions for
'/var/lib/amanda/.profile'
Jan 5 2007
10:17:31: === Amanda backup client installation complete. ===
Amanda installation log can be found in
'/var/log/amanda/install.log' and errors (if any) in
'/var/log/amanda/install.err'.
3.どのテキストエディタを使用しても良いので、xinetdの起動ファイルである、以下の内容の /etc/xinetd.d/amandaclientファイルを作成します。
#
default: on
#
# description: Amanda services for Amanda client.
#
service amanda
{
disable = no
socket_type = stream
protocol = tcp
wait = no
user = amandabackup
group =
disk
groups =
yes
server =
/usr/lib/amanda/amandad
server_args = -auth=bsdtcp amdump
}
4.Ironのxinetdを再起動します
[root@ironxinetd.d]#
service xinetd reload
Reloading configuration: [ OK ]
5.amandabackupユーザとしてIron上の/var/lib/amanda/.amandahostsファイルに「quartz.zmanda.com amandabackup amdump」というラインを加えます。これでAmandaバックアップサーバのQuartzが、AmandaクライアントのIronに接続されます。
Amandaの設定をする時はドメイン名を省略せずに記述することに注意してください(FQDN)。
-bash-3.00$
echo quartz.zmanda.com amandabackup
amdump >> /var/lib/amanda/.amandahosts
-bash-3.00$ chmod 700 /var/lib/amanda/.amandahosts
6.amandabackupユーザのホームディレクトリ内に、隠しファイルとしてパスフレーズを保存します。厳格な認証でファイルを保護します。
amandabackupユーザとして以下を入力します:
-sh-3.00$
chown amandabackup:disk ~amandabackup/.am_passphrase
-sh-3.00$ chmod 700 ~amandabackup/.am_passphrase
7.クライアントのIron上で暗号化を実行できるようにスクリプトを作成します。
rootユーザとして/usr/sbin/amcryptsimpleファイルを作成します:
#!/usr/bin/perl
-w
use Time::Local;
my $AMANDA='amandabackup';
$AMANDA_HOME = (getpwnam($AMANDA) )[7] || die
"Cannot find $AMANDA home directory\n" ;
$AM_PASS = "$AMANDA_HOME/.am_passphrase";
$ENV{'PATH'} =
'/usr/local/bin:/usr/bin:/usr/sbin:/bin:/sbin';
$ENV{'GNUPGHOME'} =
"$AMANDA_HOME/.gnupg";
sub encrypt() {
system
"gpg --batch --disable-mdc --symmetric --cipher-algo AES256
--passphrase-fd 3 3<$AM_PASS";}
sub decrypt() {
system
"gpg --batch --quiet --no-mdc-warning --decrypt --passphrase-fd 3 3<$AM_PASS";
}
if ( $#ARGV > 0 ) {
die
"Usage: $0 [-d]\n";
}
if ( $#ARGV==0 && $ARGV[0] eq
"-d" ) {
decrypt();
}
else {
encrypt();
}
8./usr/sbin/amcryptsimpleファイルの作成直後に、ファイルの所有者とパーミッションを変更します
[root@iron
sbin]# chown amandabackup:disk
/usr/sbin/amcryptsimple
[root@iron sbin]# chmod 750 /usr/sbin/amcryptsimple
9.これでIron上のAmandaクライアントの設定が完了します
Copper(SLES9) にAmandaクライアントRPMをインストールします
1.SUSE Linux Enterprise Server 9搭載のクライアント機であるCopperに、rootユーザとしてログインします。
2.Amanda 2.5.1p2 backup_client RPMをインストールします。パッケージのインストール中に、diskグループに属するamandabackupという名前のユーザを作成します。
copper:/
# rpm -ivh
amanda-backup_client-2.5.1p2-1.sles9.i586.rpm
warning:
amanda-backup_client-2.5.1p2-1.sles9.i586.rpm: V3 DSA signature: NOKEY,
key ID
3c5d1c92
Preparing... ########################################### [100%]
Jan 5 2007
07:20:21: Preparing to install: Amanda Community Edition - version
2.5.1p2
Jan 5 2007
07:20:21: Checking for 'amandabackup' user...
Jan 5 2007
07:20:21:
Jan 5 2007
07:20:21: The Amanda backup software is
configured to operate as the
Jan 5 2007
07:20:21: user 'amandabackup'. This user exists on your system and has not
Jan 5 2007
07:20:21: been modified. To ensure that Amanda functions properly,
Jan 5 2007
07:20:21: please see that the following
parameters are set for that
Jan 5 2007
07:20:22: user.:
Jan 5 2007
07:20:22:
Jan 5 2007
07:20:22: SHELL: /bin/sh
Jan 5 2007
07:20:22: HOME: /var/lib/amanda
Jan 5 2007
07:20:22: Default group: disk
Jan 5 2007
07:20:22:
Jan 5 2007
07:20:22: Checking ownership of
'/var/lib/amanda'... correct.
Jan 5 2007
07:20:22:
Jan 5 2007
07:20:22: === Amanda backup client installation started. ===
1:amanda-backup_client ###########################################
[100%]
Jan 5 2007
07:20:26: Updating system library cache...done.
Jan 5 2007
07:20:26: Checking '/var/lib/amanda/.amandahosts' file.
Jan 5 2007
07:20:27: Checking for '/var/lib/amanda/.profile' and ensuring correct
environment.
Jan 5 2007
07:20:27: Setting ownership and permissions for
'/var/lib/amanda/.profile'
Jan 5 2007
07:20:27: Checking for '/var/lib/amanda/.profile' and ensuring correct
environment.
Jan 5 2007
07:20:27: Setting ownership and permissions for
'/var/lib/amanda/.profile'
Jan 5 2007
07:20:27: === Amanda backup client installation complete. ===
Amanda installation log can be found in
'/var/log/amanda/install.log' and errors (if any) in
'/var/log/amanda/install.err'.
3.どのテキストエディタを使用しても良いので、xinetdの起動ファイルである、以下の内容の/etc/xinetd.d/amandaserverファイルを作成します。
#
default: on
#
# description: Amanda services for Amanda client.
#
service amanda
{
disable = no
socket_type = stream
protocol = tcp
wait = no
user = amandabackup
group =
disk
groups =
yes
server =
/usr/lib/amanda/amandad
server_args = -auth=bsdtcp amdump
}
5.Copperのxinetdを再起動します。
copper:/
# /etc/rc.d/xinetd restart
Reload INET services (xinetd). done
6.amandabackupユーザとしてCopper上の/var/lib/amanda/.amandahostsファイルに「quartz.zmanda.com amandabackup amdump」というラインを加えます。
これでAmadndaバックアップサーバのQuartzが、AmandaクライアントのCopperに接続されます。
Amandaの設定時にはドメイン名を省略せずに記述することに注意してください(FQDN)。
-bash-3.00$
echo quartz.zmanda.com amandabackup
amdump >> /var/lib/amanda/.amandahosts
-bash-3.00$ chmod 700 /var/lib/amanda/.amandahosts
7.これでCopper上のAmandaクライアントの設定が完了します。ここまで10分でできているはずです。
バックアップサーバのQuartz上で設定を行います:
1.amandabackupユーザに所有されパーミッションが[700]の、/etc/amandapassファイルを入力により作成します。 amandapassファイルには、ユーザと共有の名前、パスワード、ワークグループの割当があります。
rootユーザとして以下を入力します:
[root@quartz /]# echo //uranium/MyDocuments zmanda%amanda Workgroup >> /etc/amandapass
2.このファイルの所有者とパーミッションを変更します:
[root@quartz
etc]# chown amandabackup:disk
/etc/amandapass
[root@quartz etc]# chmod 700 /etc/amandapass
Windows搭載クライアント機であるUraniumの設定が完了します
Windowsからバックアップするディレクトリが共有できて、Windowsユーザであるzmandaが、パスワードamandaでアクセスできるはずです。
バックアップのパラメータ設定
1.Quartz上に、amandabackupユーザとしてAmandaの構成ディレクトリを作成します。
[root@quartz
etc]# su - amandabackup
-bash-3.00$ mkdir /etc/amanda/DailySet1
2./var/lib/amanda/example/amanda.confファイルを/etc/amanda/DailySet1ディレクトリにコピーします。amanda.confファイルはAmandaのセットアップのために最も重要なファイルです。
-bash-3.00$ cp /var/lib/amanda/example/amanda.conf /etc/amanda/DailySet1
3.Amandaと共に配布されるamanda.confのサンプルには、700行以上のソースコードと豊富なコメントがあります。詳細についてはAmanda wikiからamanda.confを検索してください。ここでは少ないソースコードに的を絞り、書き換えは最小にしてあります。
どのテキストエディタを使用しても良いので、/etc/amanda/DailySet1/amanda.confを開き、各自の環境にあった書き換えをします。
·以下のコードは、組織名と磁気テープについての詳細を特定するものです。
org
"YourCompanyName" # your organization
name for reports
mailto "root@localhost" # space separated list
of operators at your site
tpchanger "chg-disk" # the tape-changer
glue script
tapedev
"file://space/vtapes/DailySet1/slots" # the no-rewind tape device to be used
tapetype HARDDISK # use hard disk
intead of tapes (vtape config)
·仮想テープのサイズを特定するために、以下のコードを追加します:
define
tapetype HARDDISK {
length
100000 mbytes
}
Iron上の/home/pavelを暗号化してバックアップするために、以下のコードを追加します:
define
dumptype encrypt-simple {
root-tar
comment
"client simple symmetric encryption, dumped with tar"
encrypt
client
compress
fast
client_encrypt
"/usr/sbin/amcryptsimple"
client_decrypt_option
"-d"
}
amanda.confファイルにある “define dumptype global” のセクションにおいて、最後のかっこ“}”の直前に「auth "bsdtcp"」を追加します。 これで “BSDTCP” 認証が有効になります。
# index
yes
# record no
# split_diskbuffer "/raid/amanda"
# fallback_splitsize 64m
auth "bsdtcp"
4.rootユーザとして、ホールディングディスクとして使用するためのキャッシュディレクトリを作成します
[root@quartz
~]# mkdir -p /dumps/amanda
[root@quartz ~]# chown amandabackup:disk
/dumps/amanda
[root@quartz ~]# chmod 750 /dumps/amanda
5.仮想テープを作成します。vtapesと呼ばれる仮想テープとして、専用のディレクトリが使用されます。vtapesは物理テープと同様に扱います。以下の例にあるように、vtapeでテープチェンジャのシミュレーションをすることができます。
セキュリティのために、amandabackupユーザからvtapesディレクトリへのアクセスを制限します。
rootユーザとして以下を入力します:
[root@quartz
~]# mkdir -p /space/vtapes
[root@quartz ~]# chown amandabackup:disk /space/vtapes
[root@quartz ~]# chmod 750 /space/vtapes
amandabackupユーザとして以下を入力します:
-bash-3.00$
touch /etc/amanda/DailySet1/tapelist
-bash-3.00$ mkdir -p /space/vtapes/DailySet1/slots
-bash-3.00$ cd /space/vtapes/DailySet1/slots
-bash-3.00$ for ((i=1; $i<=25; i++)); do
mkdir slot$i;done
-bash-3.00$ ln -s slot1 data
6.仮想テープセットアップのテスト
-bash-3.00$
ammt -f
file:/space/vtapes/DailySet1/slots status
file:/space/vtapes/DailySet1/slots
status: ONLINE
7.物理テープのラベル付けと同様に、仮想テープもラベル付けされる必要があります。(以下は途中までの出力です)
bash-3.00$
for ((i=1; $i<=9;i++)); do amlabel
DailySet1 DailySet1-0$i slot $i; done
changer: got exit: 0 str: 1
file://space/vtapes/DailySet1/slots
labeling tape in slot 1 (file://space/vtapes/DailySet1/slots):
rewinding, reading label, not an amanda tape (Read
0 bytes)
rewinding, writing label DailySet1-01, checking
label, done.
...
changer: got exit: 0 str: 9
file://space/vtapes/DailySet1/slots
labeling tape in slot 9 (file://space/vtapes/DailySet1/slots):
rewinding, reading label, not an amanda tape (Read
0 bytes)
rewinding, writing label DailySet1-09, checking
label, done.
-bash-3.00$
for ((i=10; $i<=25;i++)); do amlabel
DailySet1 DailySet1-$i slot $i; done
changer: got exit: 0 str: 10 file://space/vtapes/DailySet1/slots
labeling tape in slot 10
(file://space/vtapes/DailySet1/slots):
rewinding, reading label, not an amanda tape (Read
0 bytes)
rewinding,
writing label DailySet1-10, checking label, done.
...
changer: got exit: 0 str: 25 file://space/vtapes/DailySet1/slots
labeling tape in slot 25
(file://space/vtapes/DailySet1/slots):
rewinding, reading label, not an amanda tape (Read
0 bytes)
rewinding, writing label DailySet1-25, checking
label, done.
8.仮想テープチェンジャを最初のスロットに戻します。
-bash-3.00$
amtape DailySet1 reset
changer: got exit: 0 str: 1
amtape: changer is reset, slot 1 is loaded.
9.Amandaの構成ディレクトリの中に、/etc/amanda/DailySet1/disklistファイルを作成します。このディスクリストには、省略されていないバックアップクライアント名、バックアップ対象となるディレクトリ、ダンプタイプが含まれます。
copper.zmanda.com
/var/www/html comp-user-tar
iron.zmanda.com /home/pavel encrypt-simple
quartz.zmanda.com //uranium/MyDocuments
comp-user-tar
10.amandabackupユーザとして、以下のコードを/var/lib/amanda/.amandahostsファイルに加えることで、リストア時にはバックアップクライアントがサーバに接続されます。ドメイン名は省略せずに記述してください(FQDN)。
iron.zmanda.com
root amindexd amidxtaped
copper.zmanda.com root amindexd amidxtaped
quartz.zmanda.com root amindexd amidxtaped
quartz.zmanda.com amandabackup admump
11.cronジョブを設定することで、amdumpを実行して自動でバックアップを開始します。 amandabackupユーザとして、crontab –eを実行し、以下のコマンドを追加することで月曜から金曜の夜1時にバックアップを実行します。
0 1 * * 1-5 /usr/sbin/amdump DailySet1
設定の検証
1.Quartz上で、amandabackupとしてamcheckを実行することで、バックアップが確実に実行できることを確認します。
-bash-3.00$
amcheck DailySet1
Amanda Tape Server Host Check
-----------------------------
Holding disk /dumps/amanda: 16714488 KB disk space
available, using 16612088 KB
slot 1: read label `DailySet1-01', date `X'
NOTE: skipping tape-writable test
Tape DailySet1-01 label ok
NOTE: conf info dir /etc/amanda/DailySet1/curinfo
does not exist
NOTE: it will be created on the next run.
NOTE: index dir /etc/amanda/DailySet1/index does
not exist
NOTE: it will be created on the next run.
Server check took 4.259 seconds
Amanda Backup Client Hosts Check
--------------------------------
Client check: 3 hosts checked in 27.097 seconds, 0
problems found
(brought to you by Amanda 2.5.1p2)
バックアップの実行
1.Quartz上で、amandabackupとしてamdumpを実行することで、DailySet1のバックアップを開始します。
-bash-3.00$ amdump DailySet1
2.Amandaは、amandabackupユーザからQuartzのrootユーザに、詳細情報のレポートを電子メールで送信します。
From
amandabackup@quartz.zmanda.com Fri Jan 5 13:04:20 2007
Date: Fri, 5 Jan 2007 13:04:19 -0800
From: Amanda user
<amandabackup@quartz.zmanda.com>
To: root@quartz.zmanda.com
Subject: YourCompanyName AMANDA MAIL REPORT FOR
January 5, 2007
These
dumps were to tape DailySet1-02.
The next tape Amanda expects to use is: a new tape.
The next new tape already labelled is:
DailySet1-02.
STATISTICS:
Total Full Incr.
-------- -------- --------
Estimate
Time (hrs:min) 0:00
Run Time (hrs:min) 0:00
Dump Time (hrs:min) 0:00 0:00 0:00
Output Size (meg) 3.5 3.5 0.0
Original Size (meg) 11.8 11.8 0.0
Avg Compressed Size (%) 29.7 29.7 --
Filesystems Dumped 3 3 0
Avg Dump Rate (k/s) 292.8 292.8 --
Tape Time (hrs:min) 0:00 0:00 0:00
Tape Size (meg) 3.7 3.7 0.0
Tape Used (%) 0.0 0.0 0.0
Filesystems Taped 3 3 0
Chunks Taped 0 0 0
Avg Tp Write Rate (k/s) 8509.1 8509.1 --
USAGE BY TAPE:
Label Time Size % Nb Nc
DailySet1-02 0:00 3744K 0.0 3 0
NOTES:
planner:
Forcing full dump of copper.zmanda.com:/var/www/html as directed.
planner:
Forcing full dump of iron.zmanda.com:/home/pavel as directed.
planner:
Forcing full dump of quartz.zmanda.com://uranium/MyDocuments as
directed.
taper: tape
DailySet1-02 kb 3744 fm 3 [OK]
DUMP
SUMMARY:
DUMPER
STATS TAPER STATS
HOSTNAME DISK L
ORIG-KB OUT-KB COMP% MMM:SS KB/s MMM:SS KB/s
--------------------------
------------------------------------- -------------
copper.zmand -r/www/html 0 7640 2336 30.6 0:03 910.6 0:00 8680.7
iron.zmanda. /home/pavel 0 3530 1024 29.0 0:07 149.1 0:00 12486.1
quartz.zmand -yDocuments 0 960 384 40.0 0:03 101.0 0:00 4295.3
(brought to you by Amanda version 2.5.1p2)
3.amadminツールのfindコマンドを実行することで、何がバックアップされたかの概要が表示されます。
-bash-3.00$
amadmin DailySet1 find
Scanning /dumps/amanda...
date host disk lv tape or file file part
status
2007-01-05 13:04:03 copper.zmanda.com
/var/www/html 0
DailySet1-02 2 -- OK
2007-01-05 13:04:03 iron.zmanda.com /home/pavel 0 DailySet1-02 3 -- OK
2007-01-05 13:04:03 quartz.zmanda.com
//uranium/MyDocuments 0
DailySet1-02 1 -- OK
15分間で異種OS混在ネットワークでのバックアップのインストール・設定・確認・実行ができました。すべて自由にダウンロードのできるオープンソースのソフトのみを使用しました。
リカバリフォーラムに寄せられたフィードバックを基にして、リストア方法の項目を追加します。
1.Copper上で、rootとして/etc/amandaディレクトリを作成します。
copper:~ # mkdir /etc/amanda
copper:~ # chown amandabackup:disk /etc/amanda
2. amandabackupとして、/etc/amanda/amanda-client.confファイルを作成し、以下のコードを追加します。
# amanda.conf - sample Amanda client configuration file.
#
# This file normally goes in /etc/amanda/amanda-client.conf.
#
conf "DailySet1" # your config name
index_server "quartz.zmanda.com" # your amindexd server
tape_server "quartz.zmanda.com" # your amidxtaped server
#tapedev "/dev/null" # your tape device
# auth - authentication scheme to use between server and client.
# Valid values are "bsd", "bsdudp", "bsdtcp" and "ssh".
# Default: [auth "bsdtcp"]
auth "bsdtcp"
# your ssh keys file if you use ssh auth
ssh_keys "/var/lib/amanda/.ssh/id_rsa_amrecover"
3. rootとして、amrecoverを実行してデータのリカバリ処理を開始します。
copper:/etc/amanda # amrecover
AMRECOVER Version 2.5.1p2. Contacting server on quartz.zmanda.com ...
220 quartz AMANDA index server (2.5.1p2) ready.
Setting restore date to today (2007-01-08)
200 Working date set to 2007-01-08.
200 Config set to DailySet1.
501 Host copper is not in your disklist.
Trying host copper.zmanda.com ...
200 Dump host set to copper.zmanda.com.
Use the setdisk command to choose dump disk to recover
amrecover>
4. 以下のコマンド群により、様々なファイルやディレクトリの集まりを、/tmpディレクトリにリカバリすることができます。
amrecover> listdisk
200- List of disk for host copper.zmanda.com
201- /var/www/html
200 List of disk for host copper.zmanda.com
amrecover> setdisk /var/www/html
200 Disk set to /var/www/html.
amrecover> ls
2007-01-05-13-04-03 tar-1.15/
2007-01-05-13-04-03 .
amrecover> cd tar-1.15
/var/www/html/tar-1.15
amrecover> ls
2007-01-05-13-04-03 scripts/
2007-01-05-13-04-03 doc/
2007-01-05-13-04-03 configure
2007-01-05-13-04-03 config/
2007-01-05-13-04-03 COPYING
2007-01-05-13-04-03 AUTHORS
2007-01-05-13-04-03 ABOUT-NLS
amrecover> add scripts/
Added dir /tar-1.15/scripts/ at date 2007-01-05-13-04-03
amrecover> add configure
Added file /tar-1.15/configure
amrecover> add doc/
Added dir /tar-1.15/doc/ at date 2007-01-05-13-04-03
amrecover> lcd /tmp
amrecover> extract
Extracting files using tape drive chg-disk on host quartz.zmanda.com.
The following tapes are needed: DailySet1-02
Restoring files into directory /tmp
Continue [?/Y/n]? y
Extracting files using tape drive chg-disk on host quartz.zmanda.com.
Load tape DailySet1-02 now
Continue [?/Y/n/s/t]? y
./tar-1.15/doc/
./tar-1.15/scripts/
./tar-1.15/configure
./tar-1.15/doc/Makefile.am
./tar-1.15/doc/Makefile.in
./tar-1.15/doc/convtexi.pl
./tar-1.15/doc/fdl.texi
./tar-1.15/doc/freemanuals.texi
./tar-1.15/doc/getdate.texi
./tar-1.15/doc/header.texi
./tar-1.15/doc/stamp-vti
./tar-1.15/doc/tar.info
./tar-1.15/doc/tar.info-1
./tar-1.15/doc/tar.info-2
./tar-1.15/doc/tar.texi
./tar-1.15/doc/version.texi
./tar-1.15/scripts/Makefile.am
./tar-1.15/scripts/Makefile.in
./tar-1.15/scripts/backup-specs
./tar-1.15/scripts/backup.in
./tar-1.15/scripts/backup.sh.in
./tar-1.15/scripts/dump-remind.in
./tar-1.15/scripts/restore.in
amrecover> quit
200 Good bye.
5.以下のコマンドを実行することで、ファイルが確実にリカバリされたことを確認できます。
copper:/ # tree /tmp/tar-1.15
/tmp/tar-1.15
|-- configure
|-- doc
| |-- Makefile.am
| |-- Makefile.in
| |-- convtexi.pl
| |-- fdl.texi
| |-- freemanuals.texi
| |-- getdate.texi
| |-- header.texi
| |-- stamp-vti
| |-- tar.info
| |-- tar.info-1
| |-- tar.info-2
| |-- tar.texi
| `-- version.texi
`-- scripts
|-- Makefile.am
|-- Makefile.in
|-- backup-specs
|-- backup.in
|-- backup.sh.in
|-- dump-remind.in
`-- restore.in
2 directories, 21 files
Amandaについての詳細は Amandaの概要をご覧ください。


